


As stated in my first post to this blog, I am writing to the new Sage SalesLogix (SLX) user who wants to learn more about reporting against their database. This post will focus on adding your new report into SLX for centralized use.
You have created your report in Crystal, shown it to your boss who flipped over its content and now he has asked you to make this report available to all users. SLX provides a home for those important reports and provides you the ability to filter down by Group, User and Dates.
What do you need:
- Access to the SLX Architect
- The main table for your report.
- The UserId and Date fields from the main table that you want to use with the standard SLX filters.
First, enter into the Architect, find the Manage menu item and select “Reports..” from the list.
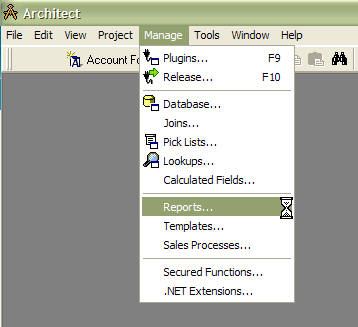
The Manage Crystal Report view appears.


The navigation tree list all of the families of reports available in SLX. Find and highlight the family for your report, my example the report I am installing is an Account Detail report so I am chosing the Accont family.
Next, select the New Report Icon  located on the upper left hand corner.
The Select Crystal Report view appears.
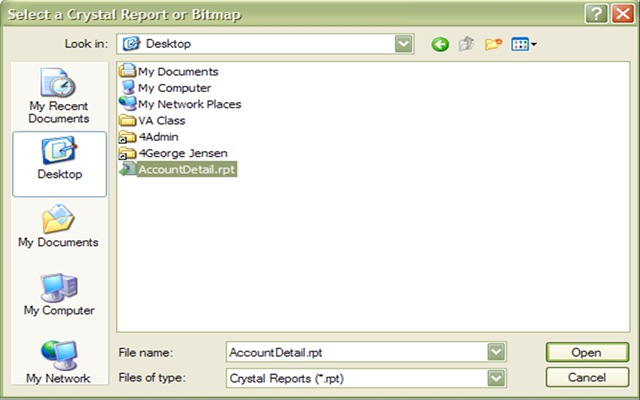
Navigate to where your report is currently stored, highlight your report and select the “Open” button.
The Crystal Report Properties view now appears.

Ensure the the Report Family field is filled in correctly.
In the Report Name field, name your report the way you want it to display in a list. This setting will appear in the navigation tree in the SLX Architect and the reports list in the client.
In the Main Table field, select the main table for the report from the drop down list. This table should contain the UserID or the Date you wish to filter by in the SLX environment.
To use the group selection criteria in your filtering ensure the “Show Group Filter” check box is checked.
Select your UserId field from the “Master User Field” drop down list. The list is populated by the selection in the “Main Table” field. Know that populating this field is not a requirement, the report will work with or without this populated. But if you want to use a UserID field as a filtering criteria within the SLX environment you must ensure a UserID field is chosen and the “Show User Filter” is checked. The same rules apply for the Master Date field.
On the selection of OK, the Crystal Report Properties view closes and the report displays in the Manage Crystal Reports list under the family of Account.

To release the report, select the “Manage Release” tool bar icon.

Here you have the ability to release to an individual User, to specifc Departments and/or Teams, and of course “Everyone”. Make your release selection and select OK. On the return to the Manage Crystal Reports view, select OK and exit Architect. Open the SLX client and navigate to the Reports area to find your report ready to use.
I am off for the next two weeks serving in the National Guard. Future post will focus on how to set up your report data using the Add Command. Some other tricky topics we have run into are formatting SLX phone numbers and then displaying addresses. After that I thought we could start digging into Sage SalesLogix Visual Analyzer. I recently became Developer certified through Sage on this outstanding tool and have started playing around with different common scenarios.


thank you very much for this useful information