


In this post, I will outline a relatively simply process for displaying data in SageCRM from an external data source. To keep this simple, we’re not going to worry about any sort of security, and we’ll save more advanced formatting for another post.
First of all, we need to create a reference to an external data source. For this example, I’m using the Standard “Northwind” database installed with SQL. To create a connection to an external datasource, click the “Administration” button, then “Advanced Customization” and finally “Tables and Databases”.
Once in this area, click the “New Database Connection” button which will presented a Database Details view where you enter your connection information
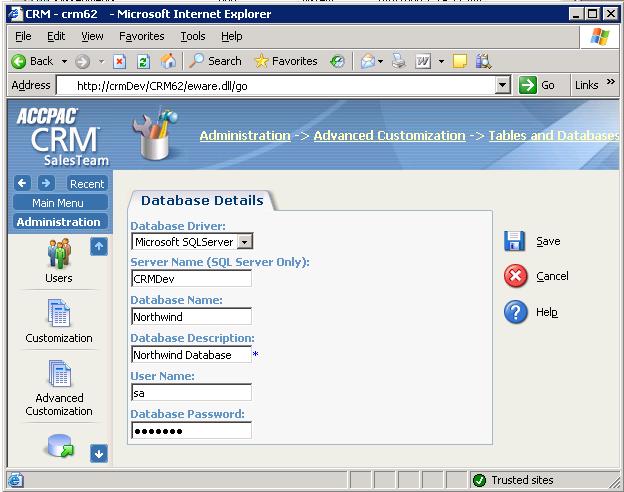
I’ve entered the following info:
- Database Driver: There are a number of options here, but since I’m connecting to a SQL database, I selected Microsoft SQLServer
- Server Name: The name of the SQL server containing the external database.
- Database Name: The name of the External Database.
- Database Description
- Username/Password: For the sake of this example, I’m simply using the standard sa username/password for this server.
Click “Save” after entering this information. The Northwind database will now display in the list of available Databases, however we still need to include a table. For this example, I’m going to use the “Orders” table in Northwind, but we need to perform a step on the database before we can display information from this table on the Team CRM tab.
To display on the Team CRM tab, the table needs to contain a field named chan_channelid. This field is used by the Team CRM tab to determine if the current user has access to see this data. For this example, we want all users to see this, so we want this field to contain a value of 5. We could just add a new column and insert that value across the entire table, however to avoid modifying the original source data, I’m going to create a view instead.
To create the view, I use the following syntax in SQL Query anaylizer:
create view vOrders as select 5 as chan_channelid, * from orders
I now have a view named “vOrders” which I can use in SageCRM
Back under Administration|Advanced Customizations|Tables and Databases, click the “New Table Connection” button to bring up the table details view:
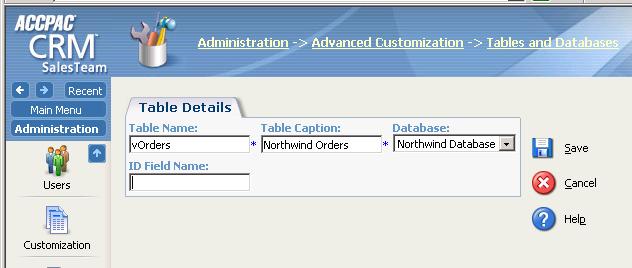
On this view, we need to fill in the following information:
- Table Name: This is the name of the view we created earlier
- Table Caption: This is the caption by which the table (view) will be identified in SageCRM (Note: This value cannot contain spaces)
- Database: This pull-down should contain the Northwind database that we created the connection to earlier.
- ID Field Name: For this example, we’re going to leave this value blank for now.
Click “Save” on this view. The data from the Northwind Orders table will now be available in SageCRM
Now that we’ve created connections to the Northwind table and Orders database (via a view), we need to create a list view containing Orders data. Go to Administration|Customizations. You should find the entry for “NorthwindOrders” listed in the Secondary entities pull-down. Once that is selected, click the “Lists” tab, and click the “New” Button:
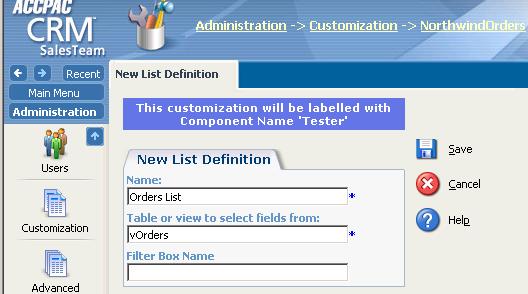
For the New List Definition, we simply need to enter:
- Name: This is the descriptive name of the List view
- Table/View: the name of our view (vOrders)
Click Save, and then click the “Customize” button next to the newly created view to define the columns to display:
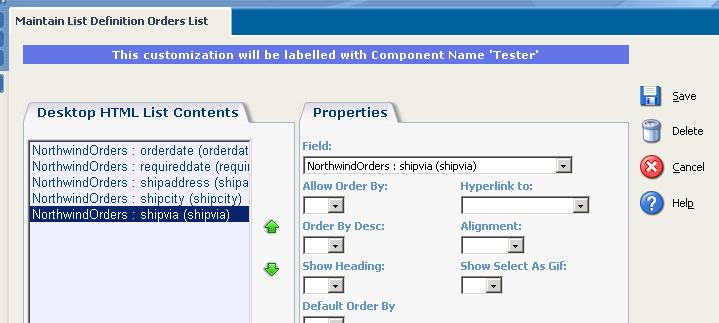
On this view, add whichever fields you want to display and click “Save” to finish configuring the new list view.
Now that we have our list view created, the only step remaining is to add the list view to the Team CRM area. To add a new tab to Team CRM, go to Administration|Advanced Customization and click on “System Menus”. The tabs under Team CRM are defined in the “Channel” tab group, so click “Customize” next to that entry:
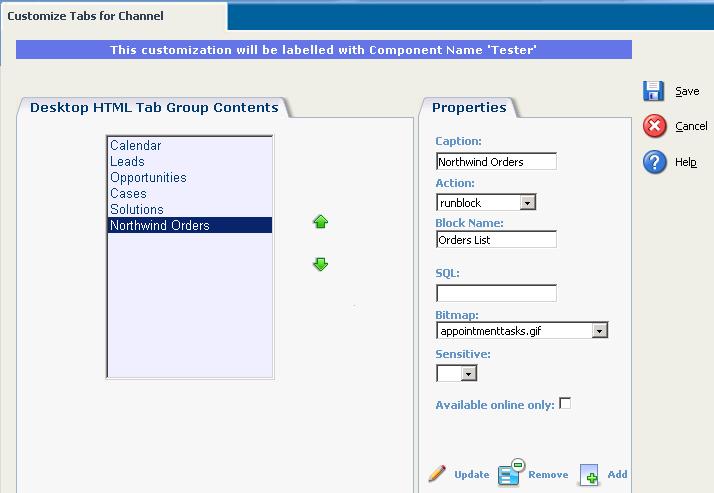
Here, we need to set three values:
- Caption: This will display on the tab under Team CRM
- Action: Run Block
- Block Name: This is the Caption we defined for the list view.
Click Save, and we are done!
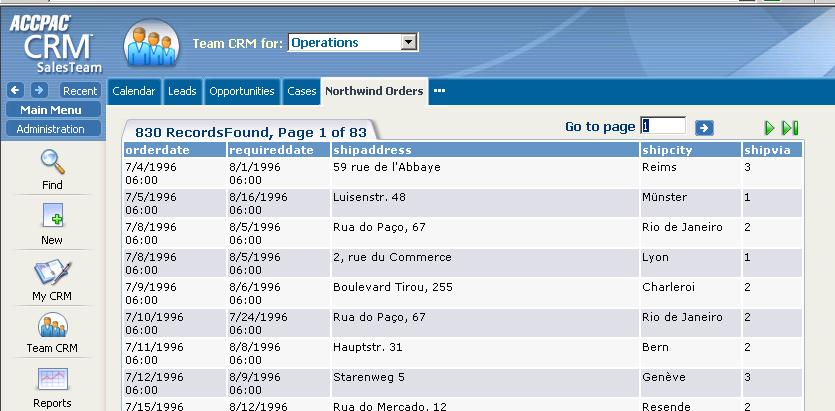
If we wanted to do additional formatting, say on the date fields or column captions, I would make those sort of changes in the view we created. Otherwise, this is a pretty simply method to display external data within SageCRM. In future postings on SageCRM, I’ll try to get into adding data related to existing entites and possibly dig more into user security topics.
I hope you find this helpful, or at least interesting. Thanks for reading! [:)]


Is it possible to create an entry screen using this method to edit/add/delete data in an external database?