back to top

SalesLogix 7.5 Web Manifest – Adding custom SmartParts

After developing in SalesLogix 7.5 web long enough you will come across one of the OOTB screens that are not editable Quick Forms or will need to build your own custom SmartParts.  These custom SmartParts are useful in they allow much more flexibility then is available in a Quick Form, however you must modify the code directly without a graphical interface.  When it comes time to bundling these custom SmartParts there are a couple of things to keep in mind.


If you wish to deploy a  custom SmartPart to another system you must add a couple of things to the SalesLogix web manifest.


The first thing that must be added is the actual SmartPart definition.  Usually when I develop a custom SmartPart I use Visual Studio to write the page.  Once it is time to bring it into the SalesLogix system you must add it to the SalesLogix Portal.  This writes the custom SmartPart to the Virtual File System.  I am not going to get into how to add these SmartParts to the VFS in this post.  What I do want to talk about is how to add them into the manifest.


If you expand out the Portal Manager in Application Architect and go to “The appropriate portal…Support Files…SmartParts..The appropriate entity”  you will see the custom SmartPart you want to add. 
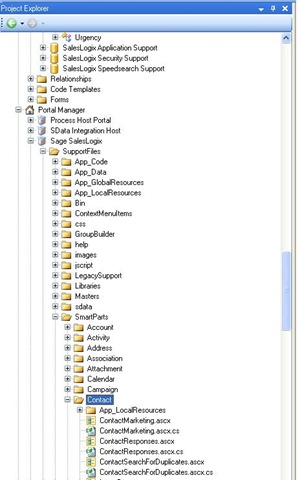

SalesLogix Manifest Custom Smart Parts


From here you can drag the custom SmartPart to your bundle manifest.  Keep in mind if your custom SmartPart has a separate code behind file and/or a resource file you will need to add each of these files to the manifest.  Lets take a look at a sample, where I have added the custom Contact SmartPart “ContactSearchForDuplicates” to a manifest.
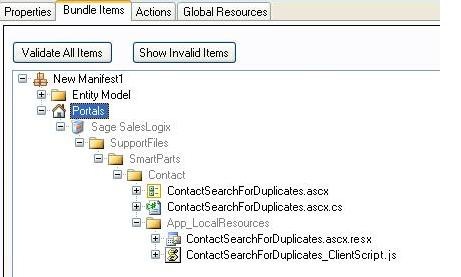

SalesLogix Manifest Adding SmartParts Support Files


Notice that in this example, there are actually four files I need to add to my manifest to completely bundle my SmartPart: the ASP page, the separate code file, a resource file, and a java script file.


Now that I have added the custom SmartPart, these custom files fro the VFS will be deployed where I install the bundle.  In addition to this I need to also bundle in the manifest, the location the custom SmartPart resides within the portal.  To do this you must bundle the page definition in the web manifest.


These definitions exist under “The appropriate portal…Pages…The appropriate entity…Smart Parts”.  IN the case of the sample above, “ContactSearchForDuplicates”, the actual page name is “Insert Contact/Account”.  Once I drag this component to the manifest it would look something like this:
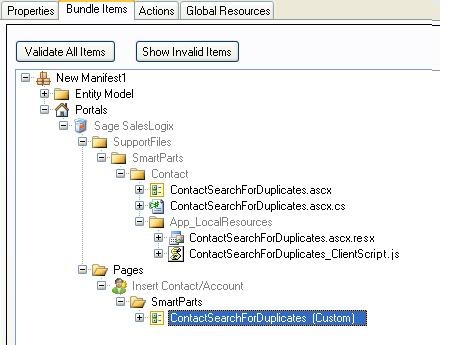

SalesLogix Manifest Adding SmartParts Pages


Only by adding both of these will you correctly get your custom SmartPart deployed successfully when your manifest is deployed in another system.  Don’t make the mistake of just adding the SmartPart definition under the “Pages” area of the portal.  Doing this does not actually include the definition of the custom SmartPart.  Adding it to the page only defines where the custom SmartPart is loaded into the portal interface.

Contact Customer FX for your CRM project
We let our expertise speak for itself - let us know how our all-star team can help on your CRM project
About the Author
Kris Halsrud
Kris Halsrud
Kris Halsrud is a Senior Analyst / Developer for Customer FX Corporation.

LEAVE A REPLY

Please enter your comment!
Please enter your name here

Infor CRM Sync for Exchange: Action Required by August 31, 2026

Using Infor CRM Sync for Exchange with Microsoft 365? Your Exchange administrator must update tenant settings by August 31, 2026 to prevent sync disruption.

[Webinar] What’s Coming Next for Infor CRM SLX and Why v10 Matters

See what’s coming next for Infor CRM SLX, including new marketing workflows, automation improvements, and reasons to consider upgrading to v10.

Disable Caching in Infor CRM SLX Web Client

In the rare case caching is causing issues in the Infor CRM SLX web client, it is possible to disable specific types of caching by making edits using Application Architect, and then deploying.

Exploring AI Options for Infor CRM v10

I've started taking a closer look at the AI capabilities built into Infor CRM v10. Over the next several posts, I'll share what I learn. From the built-in features and supported AI providers to implementation considerations, costs, and practical use cases.

Infor CRM SLX 10.0: Delegate Ownership Changes for “Everyone” Records

Learn how the new EveryoneOwnerAssignment secured action in Infor CRM SLX 10.0 allows designated users to change ownership of Everyone-owned records without requiring Administrator access.

Related Articles

Infor CRM Sync for Exchange: Action Required by August 31, 2026

Using Infor CRM Sync for Exchange with Microsoft 365? Your Exchange administrator must update tenant settings by August 31, 2026 to prevent sync disruption.

[Webinar] What’s Coming Next for Infor CRM SLX and Why v10 Matters

See what’s coming next for Infor CRM SLX, including new marketing workflows, automation improvements, and reasons to consider upgrading to v10.

Disable Caching in Infor CRM SLX Web Client

In the rare case caching is causing issues in the Infor CRM SLX web client, it is possible to disable specific types of caching by making edits using Application Architect, and then deploying.

Exploring AI Options for Infor CRM v10

I've started taking a closer look at the AI capabilities built into Infor CRM v10. Over the next several posts, I'll share what I learn. From the built-in features and supported AI providers to implementation considerations, costs, and practical use cases.

Related Videos